
Creating encrypted PDFs on a locked-down computer. Recently I have a request to send encrypted PDFs. The source file is an Excel workbook and I can’t install any software.
So I thought I go back in time for some old-school solution, Ghostscript with GhostView. Before the availability of saving as PDF or print to PDF function, these documents are created using Ghostscript. Since Ghostscript is a command-line interface, it is commonly wrapped with GhostView.
Ghostview support has ended at version 5.0. It only supports Ghostscript version 7.04-9.99. This turns out to be a headache later. To install Ghostview use 7-zip to expand the files inside the installer to a temp folder.
Ghostscript is still very much alive used in both Windows and Linux. It does not require any admin permissions to install or run. The latest version is 9.54.0 The extra .0 at the end causes GhostView to crash. Do not use the latest version, use the last version with 3 digits, 9.52
I recommend the following install paths for cleaner housekeeping
c:\Portable\GhostScript
c:\Portable\GhostView
After installation, launch GhostView.
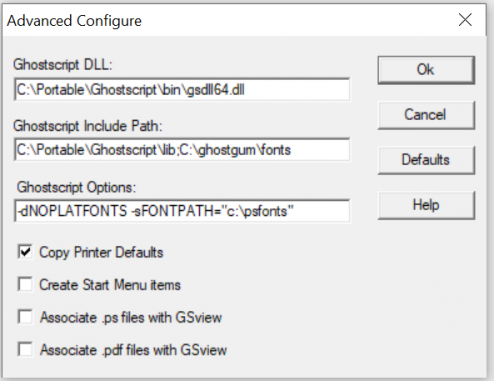
Select “Options” and “Advanced Configure”. See below and enter the paths to Ghostscript. Check “Copy Printer Defaults” and click the OK button. The last 3 checkboxes will trigger for admin permissions. Installation is nearly complete.
Press the Windows Start key, and go to “Printers and Scanners”, “Add a local printer or network printer with manual settings”. Choose the port “FILE: (Print to file)”. Select “Microsoft PS Class Driver”. Installation is now complete.
To generate a PDF is a two-step process. Print the file using the printer “Microsoft PS Class Driver”. Save it with a meaningful filename with the extension .PS
- Launch GhostView, open the PS file you have just saved.
- Select File, Convert and choose “pdfwrite”.
- Click OK button and enter the desired filename with the extension .pdf
You have now created a normal PDF file. Creating an encrypted PDF file requires adding the passwords before the PDF is created.
- Launch GhostView, open the PS file you have just saved.
- Select File, Convert and choose “pdfwrite”.
- Click on the Properties button
- Scroll down and look for OwnerPassword, click Edit button to give a password
- Repeat the same for UserPassword. You can use the same password if you want.
- Click OK button and enter the desired filename with the extension .pdf
You have now created an encrypted PDF file.